
Published: 29 June 2022
Soil nail is a supporting method when processing broken or loose slopes or deep foundations. The natural soil is reinforced on-site through the soil nailing support construction, and then it is effectively combined with the concrete formed by the steel mesh injection to construct a strong reinforcement soil nailing wall, thereby effectively blocking the pressure exerted by the soil behind the wall.
What Can Be Used as A Soil Nail?
In stable conditions, we usually use rebar, cable bolts, or conventional hollow bolts as the soil nails to reinforce the rock mass. In such conditions, there is no risk of the hole collapsing, and we can drill a hole first then put the soil nail in and grout.
However, if the rock mass is strongly weathered or fractured, it is inevitable that the drilling hole will not be there once we pull out the drill rod. Therefore, we have to drill with a casing, and this will increase the cost of the whole project. Then, do we have something to replace this? Of course yes. It is the self-drilling soil nail.
What Is a Self-Drilling Soil Nail?
The self-drilling soil nail system is composed of a hollow rock bolt, a coupler, a nut, a drill bit, a plate, and a centralizer. It is a perfect replacement for conventional soil nails when encountering poor conditions.
Drill Bit: One-time use, can be selected according to geological condition;
Hollow Rock Bolt: inner hollow to grout; made of high-strength steel; threaded on the surface, r or t thread available;
Coupler: threaded at the inner surface to connect two hollow rock bolts, extending the length to meet the requirement;
Plate: flat or domed;
Nut: hex or domed, paired with the plate to bear the force from the rock mass itself and transfer it to the whole rock bolt;
Centralizer: ensure the hollow rock bolt stays in the center of the hole when drilling.
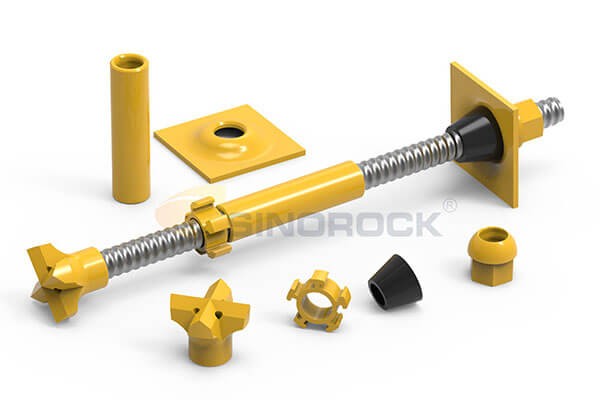
It can combine drilling, grouting, and anchoring in one process. The self-drilling soil nail system is safe, efficient, and convenient. It is suitable for broken rock, loose soil, and geological conditions where is difficult to drill holes. It helps to ensure the anchoring effect in complex ground conditions and achieve the best construction result.
So, whats the installation procedure difference between conventional soil nails and self-drilling soil nails?
When supporting the deep foundation, the installation procedure of the conventional soil nails and the self-drilling soil nails are below respectively.
Conventional Soil Nail Installation Procedure
Excavating
Excavation should be carried out layer by layer and section by section. Every layer should not be deeper than 6m and every section should not be longer than 15m.
First Concrete Shot
In order to avoid the collapse of the excavated slope during the construction of the soil nail wall, after the excavation of the earthwork is completed, the concrete should be sprayed in time. The thickness should be maintained at 35-45 mm, and the water-cement ratio of the concrete should be controlled at about 0.5. The concrete spraying is carried out in sections and pieces from bottom to top in the same working section. After the final solidification of the concrete is completed, it is good to wait 3 more days to begin the following process.
Locate the Drill Position
Locate and mark the drill positions before drilling according to the design requirement.
Drill the hole
Drill the hole to the required depth with the rig or other equipment.
Insert the Soil Nail
Pull out the drill rod and put the soil nail in the hole.
Grout
Before grouting, add a grouting stopper and an exhaust pipe at the orifice, and tighten the grouting stopper to make it closely fit with the hole wall; the insertion depth of the grouting pipe is 25-30cm to the bottom of the hole. Then grout until the pipe is filled or the exhaust pipe stops exhausting.
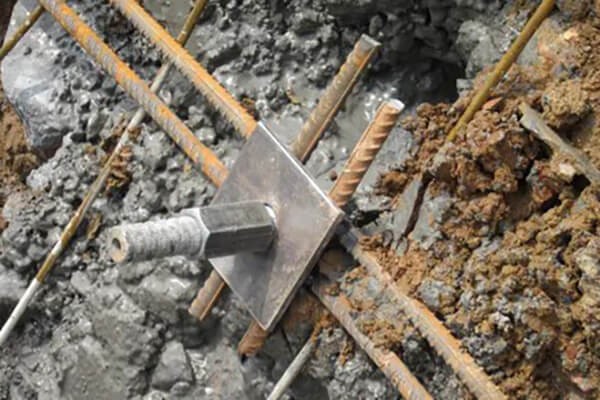
Binding Steel Mesh
Binding the steel mesh to the soil nail to combine the soil nail and steel. After the binding is completed, the reinforcing bars can be welded so that the reinforcing bars, reinforcing bars, and soil nails can be integrated into one. layer thickness.
Concrete Shot Again
After binding the steel mesh, we need to take the second concrete shot to cover the steel mesh.
Self-drilling Soil Nail Installation Procedure
Excavating Locate and mark the drill position Drill and grout simultaneously Binding steel mesh Concrete shot again
Above we can see that the installation procedure of the self-drilling soil nail is more simple than the former, which means that it will save the cost of the whole project.
The self-drilling soil nailing support construction technology is mainly suitable for groundwater level clay soil or plastic hard plastic clay after artificial dewatering, cemented silt, sandstone, and gravel fill. If combined with other construction techniques, it can also be applied to miscellaneous fill, loose sand, soft plastic, and so on. It should be noted that the depth should be less than 18m.
Categories
Deep Foundations
Keywords
soil nail